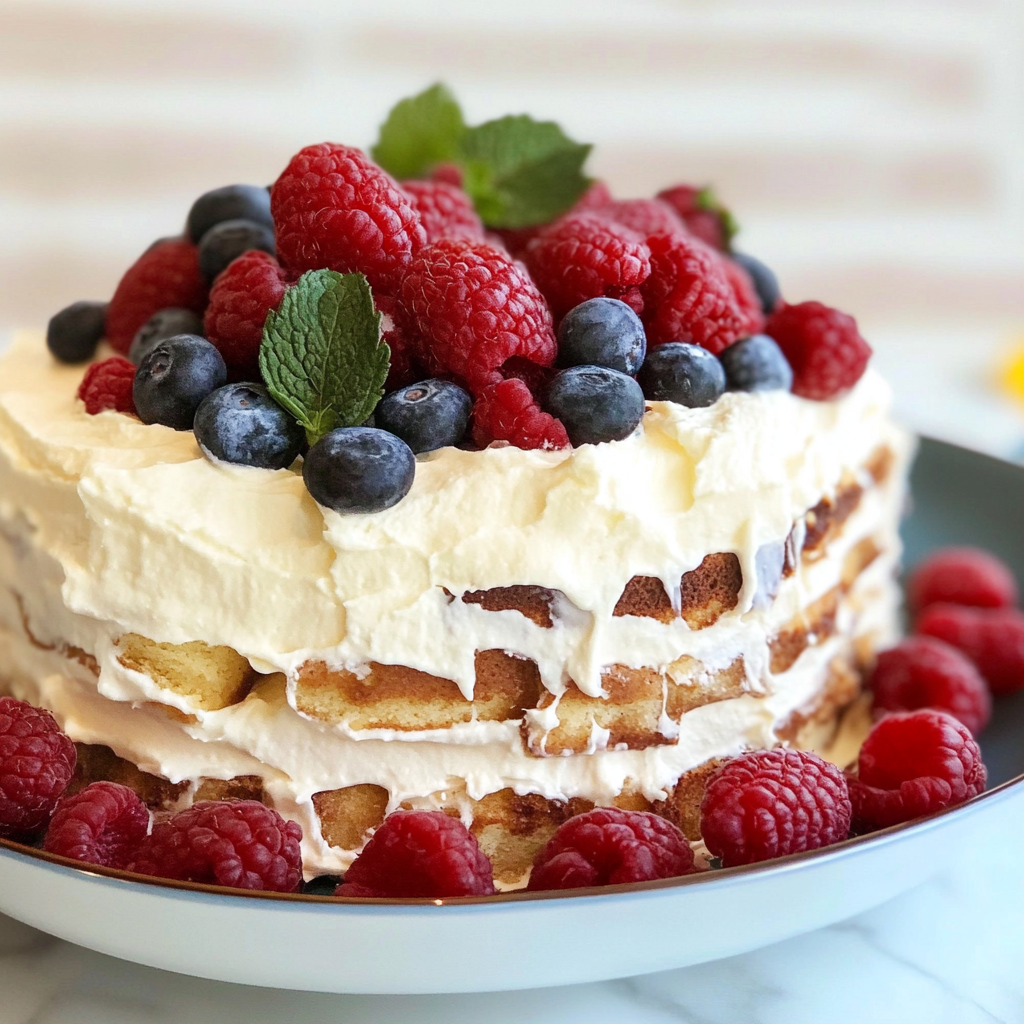
The mere thought of Vanilla Wafer Icebox Cake brings to mind a delightful blend of creamy, dreamy layers that melt in your mouth. Imagine biting into soft, fluffy clouds of vanilla flavor, mixed with the satisfying crunch of sweet wafers, creating a texture explosion that dances on your taste buds. light and refreshing salad This is not just a dessert; it’s a celebration of nostalgia, perfect for family gatherings or lazy afternoons when you want to indulge in something truly special.
Jump to:
- <strong>Essential Ingredients</strong>
- <strong>Let’s Make it Together</strong>
- <strong>Perfecting the Cooking Process</strong>
- <strong>Add Your Touch</strong>
- <strong>Storing & Reheating</strong>
- <strong>FAQ</strong>
- Can I use different types of wafers?
- How long should I refrigerate the cake?
- Can I make this cake ahead of time?
- 📖 Recipe Card
Picture this: a warm summer day, laughter fills the air, and you unveil this star of the show at your backyard barbecue. Friends and family gather around, eyes wide with anticipation as they catch a whiff of the sweet vanilla aroma wafting through the air. great for entertaining The first bite leaves everyone in blissful silence—until they start clamoring for seconds! Trust me; this Vanilla Wafer Icebox Cake will make you the dessert hero in your circle!
Why You'll Love This Recipe
- This Vanilla Wafer Icebox Cake is incredibly easy to prepare with minimal ingredients
- The flavor profile is a delightful mix of sweetness and creaminess that appeals to all ages
- Its stunning visual appeal makes it a showstopper at any gathering
- Plus, it’s versatile enough to customize with different flavors or toppings based on your mood!
I remember the first time I made this Vanilla Wafer Icebox Cake for my family reunion. My cousin took one bite and declared it “the best thing since sliced bread.” Talk about pressure for my next family gathering! For more inspiration, check out this No-Bake Lemon Icebox Pie recipe.

Essential Ingredients
Here’s what you’ll need to make this delicious dish:
- Vanilla Wafers: These sweet cookies provide the cake’s base and are essential for that classic flavor; choose a good quality brand.
- Instant Vanilla Pudding Mix: This makes preparation super quick while adding richness; opt for high-quality pudding mix for best results.
- Milk: Use whole milk for creaminess; almond or oat milk can work if you’re looking for dairy-free options. savory appetizer option.
- Whipped Topping: Lighten up the layers with whipped topping; homemade whipped cream can elevate the flavor even more. For more inspiration, check out this Classic Strawberry Shortcake recipe.
- Fresh Berries (optional): Strawberries or blueberries add freshness and color; they are perfect for garnishing or mixing within layers.
The full ingredients list, including measurements, is provided in the recipe card directly below.
Let’s Make it Together
Prepare Your Pudding Mixture: In a large bowl, combine instant vanilla pudding mix with cold milk. Whisk vigorously until smooth and thickened—about two minutes should do it.
Create Your Layers: Take a 9×13 inch dish and start layering by placing vanilla wafers at the bottom. It’s like building a cookie fortress—don’t skimp on coverage!
Add the Creamy Filling: Spoon half of the prepared vanilla pudding mixture over the layer of wafers. Spread it evenly to ensure every bite is creamy goodness.
Repeat Layering Magic: Repeat the process by adding another layer of vanilla wafers followed by the remaining pudding mixture. It’s like stacking happiness in each layer!
Top It Off!: Finish with a final layer of whipped topping spread smoothly across the top. If desired, sprinkle fresh berries over it for an aesthetic touch.
Chill Before Serving: Cover your masterpiece with plastic wrap and refrigerate for at least four hours—or overnight if you can wait! This allows flavors to meld beautifully.
Now you have created an incredible Vanilla Wafer Icebox Cake that will impress anyone who lays eyes on it! Enjoy making memories as you serve this delightful treat!
You Must Know
- The Vanilla Wafer Icebox Cake is a delightful treat that combines simplicity and elegance
- Perfect for summer gatherings, its creamy layers and crispy wafers create a sensational mouthfeel
- Plus, it’s a no-bake dessert, making it a breeze to whip up, even on busy days
Perfecting the Cooking Process
Begin by layering vanilla wafers and whipped cream in a dish. Alternate layers until you reach the top, then chill for at least four hours. perfect creamy side dish This allows the wafers to soften perfectly while melding with the creamy goodness.
Add Your Touch
Feel free to swap vanilla wafers with chocolate ones for a decadent twist. Add fresh fruit like strawberries or bananas between layers for extra flavor and texture. A sprinkle of nuts can also provide that delightful crunch.
Storing & Reheating
Store any leftover Vanilla Wafer Icebox Cake in an airtight container in the fridge for up to three days. There’s no need to reheat; just serve chilled for the best experience.
Chef's Helpful Tips
- Use cold heavy cream for whipping; it whips up fluffier and holds its shape better
- Ensure you fully chill the cake so flavors meld beautifully
- Don’t rush the chilling time; perfect texture comes with patience!
I once brought this Vanilla Wafer Icebox Cake to a family picnic, and it vanished quicker than my Uncle Bob at a buffet line! It’s truly a crowd-pleaser.
FAQ
Can I use different types of wafers?
Absolutely! Chocolate or strawberry wafers work wonderfully for unique flavor profiles.
How long should I refrigerate the cake?
For best results, refrigerate for at least four hours or overnight.
Can I make this cake ahead of time?
Yes! This cake actually tastes better when made a day in advance, allowing flavors to develop.
Did You Enjoy Making This Recipe? Please rate this recipe with ⭐⭐⭐⭐⭐ or leave a comment.
📖 Recipe Card
Print
Vanilla Wafer Icebox Cake
- Total Time: 0 hours
- Yield: Approximately 12 servings 1x
Description
Indulge in the creamy, dreamy layers of Vanilla Wafer Icebox Cake—a no-bake dessert that combines the sweetness of vanilla wafers with rich pudding and whipped topping. Perfect for summer gatherings or any occasion, this delightful treat is sure to impress friends and family with its nostalgic flavor and easy preparation.
Ingredients
- 1 box (11 oz) vanilla wafers
- 1 package (3.4 oz) instant vanilla pudding mix
- 2 cups whole milk
- 1 container (8 oz) whipped topping
- Fresh berries (optional, for garnish)
Instructions
- In a large bowl, whisk together the instant vanilla pudding mix and cold milk until smooth and thickened, about 2 minutes.
- In a 9×13 inch dish, layer vanilla wafers to cover the bottom.
- Spoon half of the pudding mixture over the wafers, spreading evenly.
- Add another layer of vanilla wafers followed by the remaining pudding mixture.
- Top with whipped topping and optional fresh berries.
- Cover with plastic wrap and refrigerate for at least 4 hours or overnight before serving.
- Prep Time: 15 minutes
- Cook Time: None
- Category: Dessert
- Method: No-bake
- Cuisine: American
Nutrition
- Serving Size: 1 slice (100g)
- Calories: 220
- Sugar: 18g
- Sodium: 90mg
- Fat: 8g
- Saturated Fat: 4g
- Unsaturated Fat: 3g
- Trans Fat: 0g
- Carbohydrates: 33g
- Fiber: 1g
- Protein: 3g
- Cholesterol: 15mg
