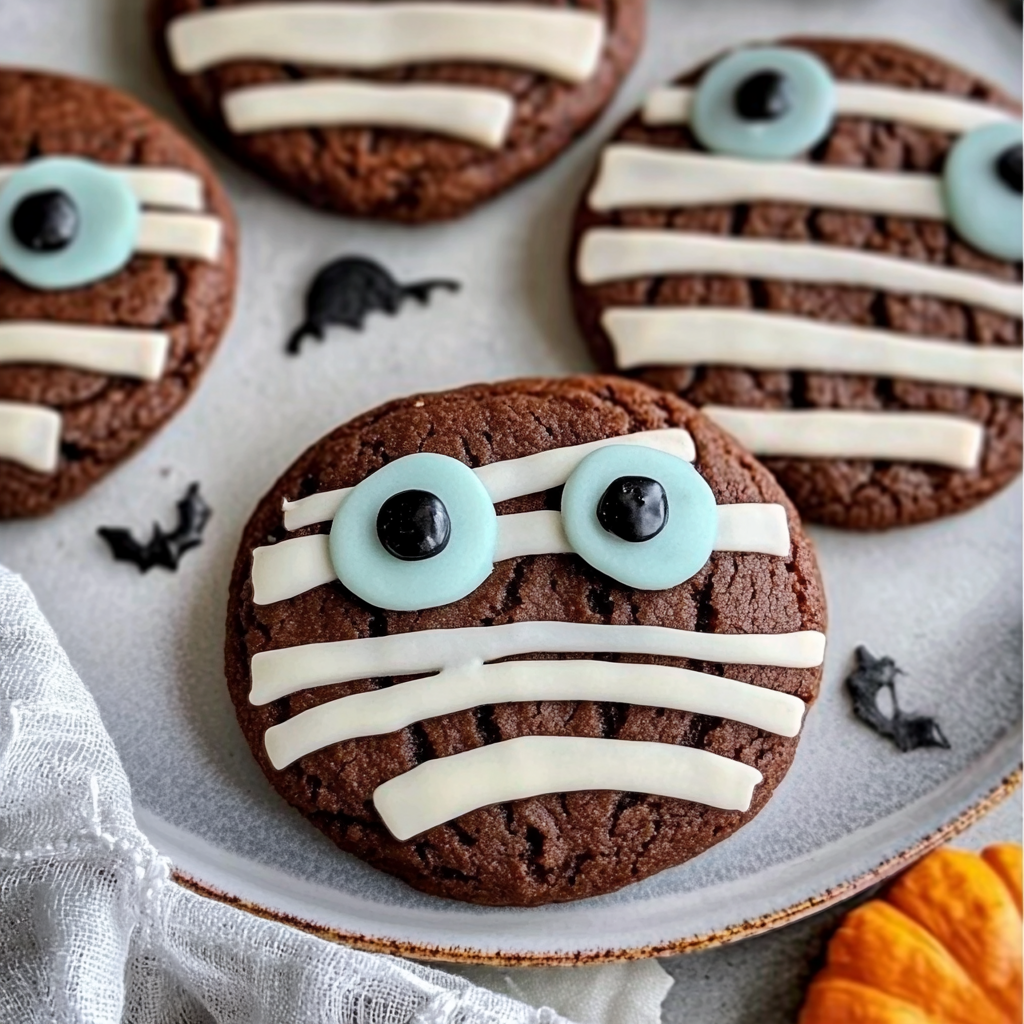
It’s that spine-tingling time of year when ghouls and goblins roam the streets, and your kitchen becomes a haunted hideaway filled with the delightful aroma of freshly baked Halloween Mummy Cookies. Picture this: soft, chewy cookies wrapped in layers of gooey white chocolate, with little candy eyes peeking out. Halloween strawberries treats chocolate Halloween popcorn balls These treats are not just delicious; they are the perfect spooky snack to impress your friends at any Halloween gathering. mummy wrapped brie.
Jump to:
- <strong>Essential Ingredients</strong>
- <strong>Let’s Make It Together</strong>
- <strong>Perfecting the Cooking Process</strong>
- <strong>Add Your Touch</strong>
- <strong>Storing & Reheating</strong>
- <strong>FAQ</strong>
- What type of chocolate works best for Halloween Mummy Cookies?
- Can I freeze these cookies?
- How do I achieve perfect icing consistency?
- 📖 Recipe Card
As you bite into these whimsical delights, the sweet flavors will dance on your tongue, and you’ll feel like a kid again, eagerly waiting for the next piece of candy to drop into your trick-or-treat bag. Whether you’re hosting a Halloween party or just looking to celebrate the season with something fun, these cookies will have everyone smiling—and possibly screaming in delight!
Why You'll Love This Recipe
- These Halloween Mummy Cookies are incredibly easy to prepare, making them perfect for last-minute parties
- The combination of soft cookie texture and rich chocolate flavor is simply irresistible
- Visually appealing, they bring a festive touch to any dessert table
- Plus, they’re versatile enough for decorating with your favorite spooky toppings!
I remember one Halloween when my kids and their friends devoured these cookies so quickly that I barely had time to snap a photo before they disappeared!
Essential Ingredients
Here’s what you’ll need to make this delicious dish:
- All-Purpose Flour: Use fresh flour for the best baking results; it gives structure and chewiness to each cookie.
- Baking Soda: Essential for helping your cookies rise; make sure it’s fresh for maximum effectiveness.
- Salt: Enhances all other flavors; don’t skip it or your cookies might taste flat!
- Unsalted Butter: Room temperature butter ensures smooth mixing and a rich flavor; I prefer using high-quality brands.
- Granulated Sugar: Sweetness is key here; it balances perfectly with the chocolate’s richness.
- Brown Sugar: Adds moisture and a hint of caramel flavor; use light brown sugar for a softer cookie.
- Eggs: A binding agent that helps create that chewy texture we love; ensure they’re at room temperature.
- Vanilla Extract: A splash enhances sweetness and adds depth to your cookie dough.
- White Chocolate Chips: For melting into mummy wrappings; choose good quality chips for better melting.
- Candy Eyes: The finishing touch that brings these mummies to life—look for them at craft stores or online!
The full ingredients list, including measurements, is provided in the recipe card directly below.

Let’s Make It Together
Preheat Your Oven: Preheat your oven to 350°F (175°C). Line two baking sheets with parchment paper to prevent sticking—no one wants a cookie tragedy!
Mix Dry Ingredients: In a bowl, whisk together flour, baking soda, and salt until combined. This step takes only 30 seconds but ensures even distribution of ingredients.
Cream Butter and Sugars: In a large mixing bowl, beat softened butter with granulated and brown sugars until fluffy. This process should take about 2-3 minutes; watch for it becoming light in color.
Add Eggs and Vanilla: Beat in eggs one at a time along with vanilla extract. Mix until fully incorporated—this adds moisture and flavor that make everyone come back for seconds.
Add Dry Ingredients: Gradually mix in your dry ingredients until just combined. Be careful not to over-mix! You want those cookies soft and chewy. For more inspiration, check out this chewy caramel cookies recipe.
Add White Chocolate Chips: Gently fold in white chocolate chips using a spatula—it’s okay if some chips are broken up! They will melt beautifully when baked.
Scoop and Bake: Using a cookie scoop or spoon, drop dough onto prepared sheets about 2 inches apart. Bake for 10-12 minutes until edges are golden but centers remain soft.
Melt White Chocolate: While cookies cool, melt remaining white chocolate chips in the microwave or double boiler until smooth. Stir regularly to avoid scorching—and don’t forget to taste test! For more inspiration, check out this double chocolate cookies recipe.
Mummy Wrapping Time: Dip each cooled cookie halfway into the melted chocolate or drizzle it over using a fork. Quickly place candy eyes on top before the chocolate hardens!
Now you have some fabulously festive Halloween Mummy Cookies ready to scare up some smiles at your next gathering! Enjoy every spooky bite as you share them with family and friends—just be prepared for requests for more! spooky spider pizzas.
You Must Know
- Halloween Mummy Cookies are not just delicious; they are a spooky delight that kids and adults will love
- Their creamy icing and chocolate eyes make them irresistibly cute
- Plus, these cookies are perfect for any Halloween party or family gathering
Perfecting the Cooking Process
Start by preheating your oven to 350°F (175°C) while you mix your dough. Bake the cookies until golden brown, letting them cool completely before adding icing to prevent it from melting off.
Add Your Touch
Feel free to swap out chocolate chips for colorful candies or add sprinkles for an extra festive look. You can also use different flavored extracts, like almond or peppermint, for a unique twist.
Storing & Reheating
Store your Halloween Mummy Cookies in an airtight container at room temperature for up to a week. If you want to enjoy them warm, pop them in the microwave for about 10 seconds.
Chef's Helpful Tips
- These Halloween Mummy Cookies are a fantastic way to celebrate the spooky season with family and friends
- Keep an eye on the baking time, as even one minute can make a difference
- Experiment with different icing designs to make each cookie unique!
I still remember the first time I made these cookies; my niece couldn’t stop giggling at their silly faces! Her excitement reminded me how much fun cooking can be when shared with loved ones.
FAQ
What type of chocolate works best for Halloween Mummy Cookies?
Use semi-sweet chocolate chips for a balanced sweetness that complements the sugar cookie base.
Can I freeze these cookies?
Absolutely! Freeze them in an airtight container for up to three months for later enjoyment.
How do I achieve perfect icing consistency?
Aim for a thick but smooth consistency; it should flow easily but hold its shape without running off.
Did You Enjoy Making This Recipe? Please rate this recipe with ⭐⭐⭐⭐⭐ or leave a comment.
📖 Recipe Card
Print
Halloween Mummy Cookies
- Total Time: 27 minutes
- Yield: Approximately 24 cookies 1x
Description
Halloween Mummy Cookies are the perfect spooky treat that will delight kids and adults alike. These soft, chewy cookies are wrapped in gooey white chocolate, with playful candy eyes peering out, making them a festive addition to your Halloween celebrations. Easy to prepare and irresistibly cute, they’re sure to bring smiles at any gathering!
Ingredients
- 2 1/2 cups all-purpose flour
- 1 tsp baking soda
- 1/2 tsp salt
- 3/4 cup unsalted butter (softened)
- 1 cup granulated sugar
- 1/2 cup brown sugar (light)
- 2 large eggs (room temperature)
- 2 tsp vanilla extract
- 1 cup white chocolate chips
- Candy eyes (for decoration)
Instructions
- Preheat oven to 350°F (175°C) and line two baking sheets with parchment paper.
- In a bowl, whisk together flour, baking soda, and salt.
- In a large mixing bowl, cream softened butter with granulated and brown sugars until fluffy, about 2-3 minutes.
- Beat in eggs one at a time along with vanilla extract until fully incorporated.
- Gradually mix in dry ingredients until just combined; avoid over-mixing.
- Fold in white chocolate chips gently.
- Scoop dough onto prepared sheets about 2 inches apart and bake for 10-12 minutes until golden around the edges but soft in the center.
- Let cookies cool before dipping halfway into melted white chocolate or drizzling it on top. Quickly place candy eyes before the chocolate hardens.
- Prep Time: 15 minutes
- Cook Time: 12 minutes
- Category: Dessert
- Method: Baking
- Cuisine: American
Nutrition
- Serving Size: 1 cookie (30g)
- Calories: 150
- Sugar: 11g
- Sodium: 70mg
- Fat: 7g
- Saturated Fat: 4g
- Unsaturated Fat: 3g
- Trans Fat: 0g
- Carbohydrates: 20g
- Fiber: <1g
- Protein: 2g
- Cholesterol: 20mg
